I’ve had an Ender 3D filament printer for some time now. The results have not been spectacular, so I sort of shelved the thing,
not too enthusiastic about pulling it out. As I recall it was a trick to get it level—maybe the spring/wheel thingies for adjusting
the bed were broken or something.
In any event, I definitely caught wind of all the hype surrounding the
Bambu Labs printers that were getting accolades.
The price was surprisingly reasonable and so I decided to pull the trigger on one to see if they were all that. It turns out
that I didn’t hate 3D printing, I just hated my Ender.
Cone Clock
The Bambu printer came with a clock mechanism—you know, the kind that takes a single battery. I am not one to read manuals, but
perhaps there was some kind of 3D clock model that you were expected to download and print? A kind of Hello World.
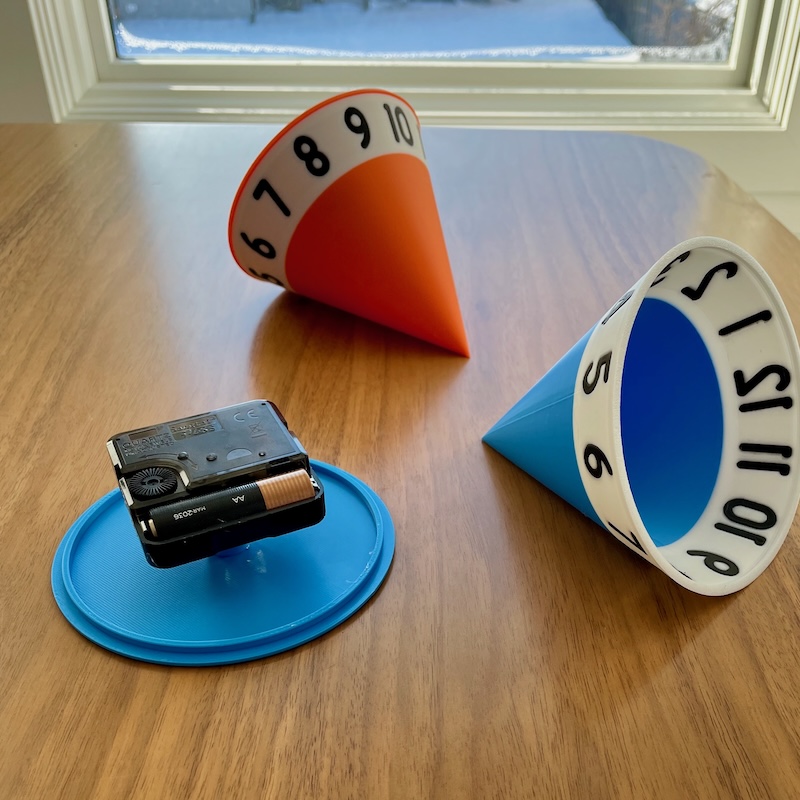
A couple of cone clocks—blue one disassembled.
As it would happen, I had sketched an idea for a “cone clock” a decade or so ago. In Myst-like fashion, I imagined a mechanical
clock, shaped like a cone and machined from brass. Within the cone was a weighted clock mechanism that I imagined would slowly
rotate around within. As it did, the weight would shift such that the cone would roll very slowly around on the desk. Numerals
etched around the cone would indicate the time—the number at the top of the circumference of the cone being the current time.
So the clock doesn’t give you precise minutes, seconds. And of course you need to have a clear area on your desk to accomodate
the track of the cone/clock over the course of its full cycle.
So I tried prototyping this cone clock using FreeCAD and the Bambu 3D printer. After a
lot of iteration, I got something I would call a conditional success.
Six-hour time lapse of my cone clock.
It worked—I have the time-lapse above to prove it. But the one I built is pretty susceptible to small irregularities in the rolling
of the cone. As an example, a grain of salt perhaps (this was on a dining room table after all) could hold the clock for some time
before the cone overcame it. “I just looked at the cone, honey, we still have an hour before the movie starts.” Suddenly,
“Damn, we’re late, I just checked my phone!”
You can see a kind of staccato movement of the cone clock in the above time-lapse (with no grains of salt to be found). Perhaps from
small irregularities around the circumference of the cone? I might mitigate that if I edged the rim of the cone with a “tire”
(an O-ring perhaps). Or a heavier, more off-center internal clock mechanism that could deliver more torque.
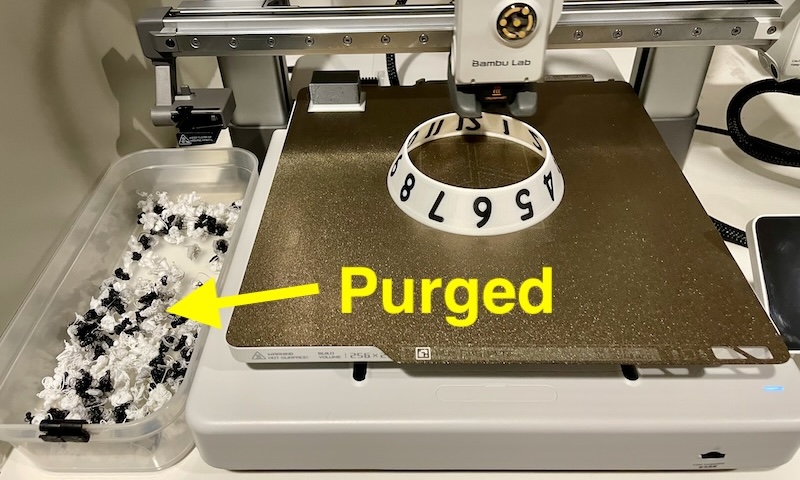
Here’s something you really ought not do with any 3D printer. The Bambu has a cool accessory that allows you to load up four
different filaments. For example, I loaded up a blue, white and black one to create the cone clock that you see. And then your
3D model can integrate these multiple filaments for different parts of the model. That’s cool and all—and I tried it—but, wow.
Imagine though you’re the 3D print head and as you rasterize each layer with numerals, you have to swap between white and black
filaments for each small segment of each number as you go around the circumference of the cone. Consider that it has to push
through enough of the new filament to purge the previous color.
Yeah, don’t ever do that. Once the cone print went to blue, it was fine. But those numbers…
Speakers
Somewhere I saw that the youth of today are experimenting with printing speaker enclosures. What?
The white speakers. (I know, and one of these days they’re gonna walk all over you.)
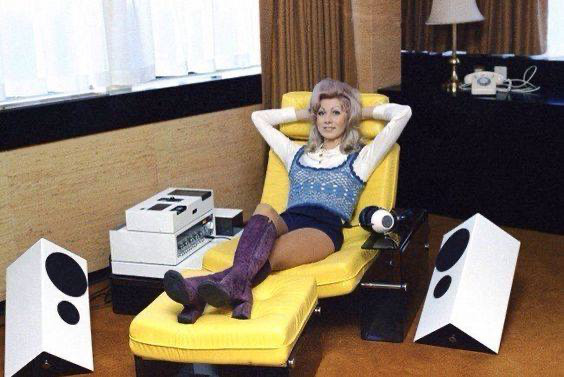
I had seen a set of speakers in an old 1970’s magazine years ago and had wanted to recreate them. I think I might have made
a stab at creating them out of wood but if so, no doubt the angles on the table saw got complicated fast. In any event, what a perfect
project for 3D printing.
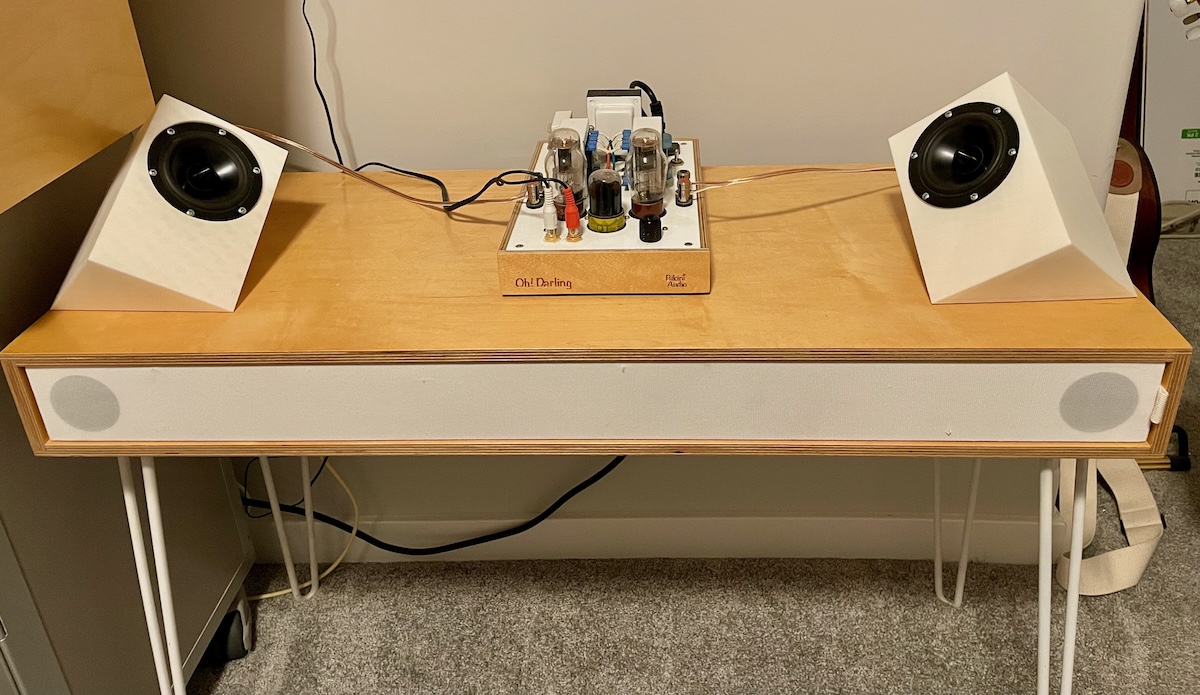
A 3D-printed speaker.
Above is my first attempt at my version of the speaker. I am into full-range drivers so used a pair that I had lying around. The
enclosures are smaller than the one in the 1970’s photo because the drivers are smaller. The enclosure was modeled, again, with
FreeCAD. I have such problems learning that tool that I kept this iteration simple—with no
bass port, just a sealed enclosure.
Redundant: that’s a wooden “speaker table” that the printed speakers are sitting on. I built it years ago and it has
its own full-range drivers and even an integrated, downward-firing sub (that you can’t see in this photo).
Above, the speakers are positioned on a “speaker table” that I had built years ago. (The table has its own set of full-range
drivers—and a downward facing sub you cannot see—so the new speakers are not needed. I wanted to hear them and see how they looked
in situ.)
These would make a lot of sense on a desk where the listener is sitting in the center. (I just liked the geometry of them.)
And Subwoofer…
Over a decade ago I had this notion to build a subwoofer enclosure in the shape of a truncated tetrahedron. I am sure I became
obsessed with this geometric shape after seeing cargo containers in that shape in the movie Silent Running (1972).
There is a kind of subwoofer driver configuration that uses a single driven element (a speaker) and two passive ones. In this kind of
arrangement the enclosure is sealed—not ported. The passive elements look like speakers but have no magnet or coil in them.
Instead they react to changes in pressure of the sealed enclosure. Adding the correct mass to the passive speaker cone allows you to
"tune" them to the desired frequency response.
In any event, with three speaker elements and a plate amplifier, by my count a four-sided enclosure would be ideal.
Ha ha, I actually filed a design patent
for the enclosure almost thirteen years ago.
Early, wooden version of my subwoofer. A little beat up now.
It was difficult to construct the enclosure in multi-ply plywood. Besides the 60 degree and 120 degree angles of the faces, I
managed to bevel the edges at the correct angle as well—cut the holes for the drivers and plate amplifier with a router…
The result was what I had hoped it would be, but making these at any kind of quantity would have been challenging.
So in 2025 I once again turned to 3D printing and FreeCAD to see if I could recreate this
enclosure at a slightly smaller scale (for 6" subwoofer drivers).
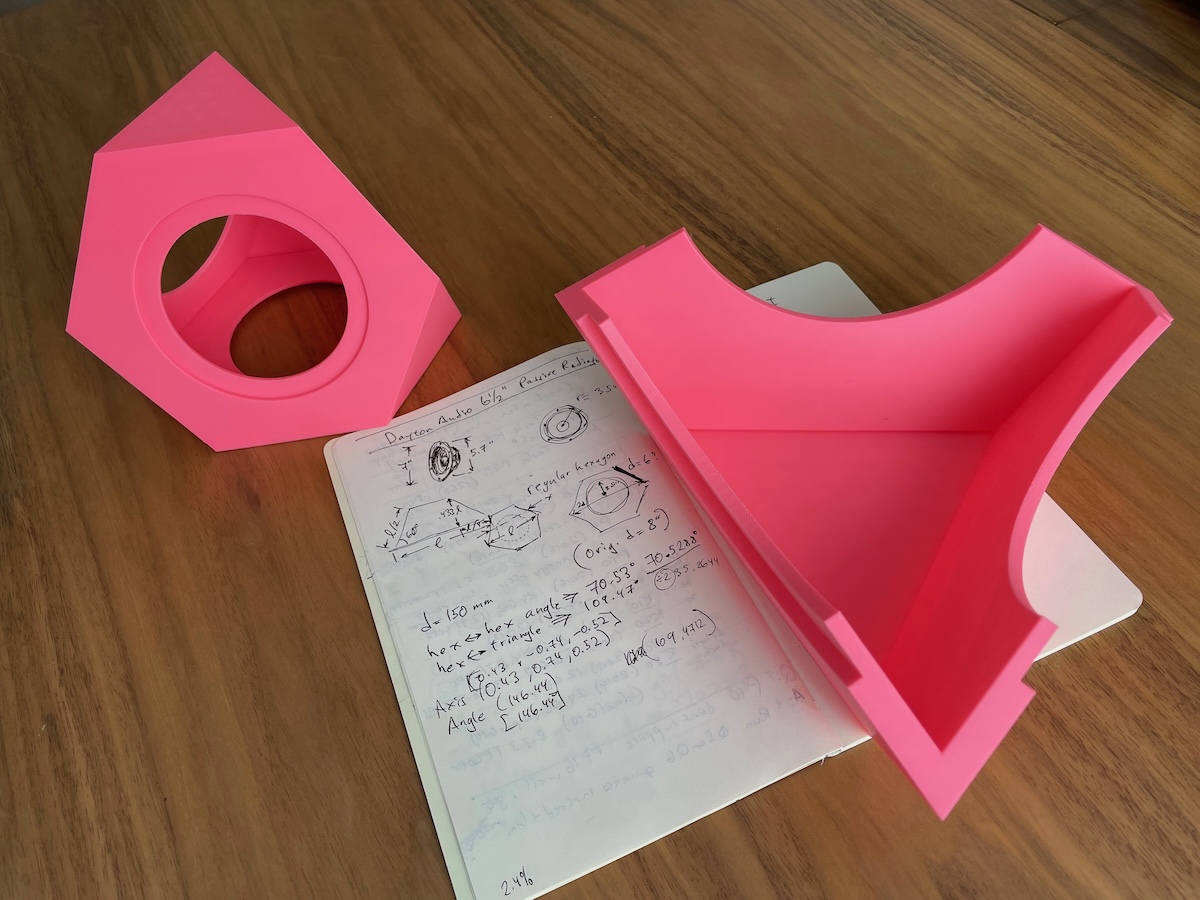
Scaled down print of the subwoofer chassis and one-quarter of the full-sized one.
For the prototyping (and I never moved beyond prototyping) I first printed a scaled down whole version of the enclosure (see the
small pink to the left in the above photo). Making one full-size however was not going to work on my 3D printer.
Due to the symmetry of the geometry, it turns out that you can more or less make four identical pieces that represent quarters
of the shape and then assemble them to create the finished enclosure. These quarters I was able to print on my 3D printer.
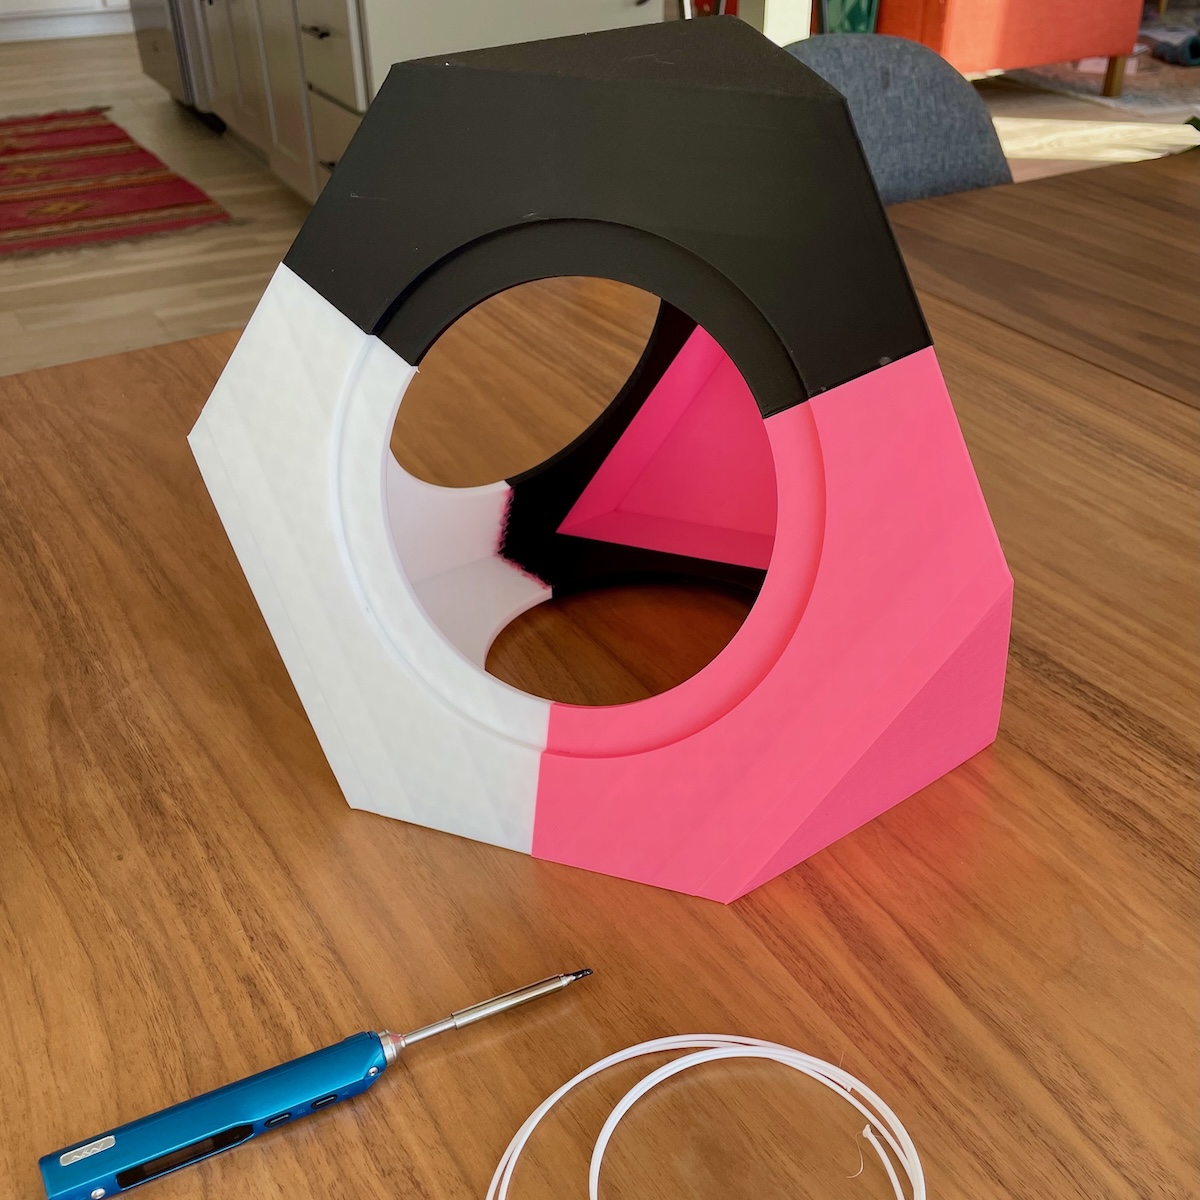
The assembled 3D-printed subwoofer enclosure. As far as I got.
Again, as it was a prototype, I used whatever filament I had on hand. It makes for a pretty ugly subwoofer when assembled, but
it does make it clear the parts that make up the whole.
An inexpensive Chinese soldering iron was used to melt/weld/fuse the quarters together—raw filament acting something like weld
filler.
The result was… I can’t fit all three drivers in at the same time. The back of the main driver (speaker) is just too deep with its
deep basket, large magnet. When I return to this project I will have to go back into FreeCAD and enlarge the enclosure by some margin
to accommodate the deeper drivers. I’ll link to that post if I come back to this project.
Maybe I can summarize all of the above by saying that the Bambu 3D printer has completely changed 3D printing for me. Prints are so
much more likely to succeed, the integration of the software and hardware is so slick that I actually enjoy 3D printing now.
On the other hand, FreeCAD has been a very painful piece of software to learn and use. Surprising me though, LLMs like ChatGPT can be
quite good at helping you use complex software like FreeCAD, Blender… The stability of FreeCAD though is such that I have to be
careful to save frequently as the MacOS version regularly crashes. Hopefully FreeCAD improves over time.